Wednesday, March 31, 2010

Make yourself a simple pencil skirt in under an hour!

OK, so here's a quick tutorial for how to make a simple pencil skirt out of knit cotton fabric without a pattern. It takes exactly 3 lines of stitching to complete.

Tools you will need:

-measuring tape
-sewing machine with ball point needle
-thread
-scissors (or rotary cutter and self-healing mat)
-pins
-enough knit fabric wide enough to go around your hips and twice the desired finished length of the skirt.

Step 1: Measure

You will need three measurements:
-Your hips at their fullest
-Your waist where you want the waistband of the skirt to sit
-The desired length of the skirt from where you want the waistband to sit, to where you want the skirt to end

Step 3: Make waistband

Take your waist measurement and multiply it by 0.8 (or 80%). For example, my waist measurement is 36". 0.8 x 36 = 28.8 , but we'll just say 29. Take this measurement as the width of the waistband piece.

Measure out a piece of fabric that is 8" tall along the grain of the fabric (the less stretchy direction), and as wide as the number you determined earlier. Make sure that this piece of fabric will sit snug against your waist while wrapped around you, but is still loose enough to pull on and off over your hips. Make sure to leave enough extra for seam allowance.

For those of you who don't like math, you can just cut out a strip of fabric 8" tall and as wide as your fabric roll, then wrap it around your hips almost as tight as it will go. Move it to your waist and see if it is comfortable. If it is too tight loosen it a little. Make sure to leave enough for seam allowance.

Fold your strip of fabric in half the long way, with right sides together, and sew it into a loop. You now have a waistband.

Note: When sewing knit fabric, I like to use a short stitch length and a slight zig-zag so that it stretches nicely. On my machine, the zig-zag stitch goes from 0-4, and I set it in between 0 and 1.

Step 4: Make Skirt

For the body of the skirt you will need to cut out one long rectangle. The measurement along the width of the fabric (in the more stretchy direction) will be your hip measurement (unless you like your skirt really loose, you can take 2 or 3 inches away from the width measurement. It's knit, it will stretch). Make the length of this piece (along the grain of the fabric) twice the length you want the finished skirt to be.

Fold this piece along the width measurement (the more stretchy direction), with the right sides together, and sew up the side opposite the fold to make a tube.

Sorry for some of the washed out pictures.

Step 5: Attach the waistband to the skirt

OK, you're almost done. Fold the skirt in half along it's length with the wrong sides together, encasing the raw edges inside. Do the same with the waistband. Now place the skirt bottom inside the loop of the waistband with the raw edges facing up (and fold facing down) for both. Match the seams together and pin the waistband to the skirt, matching the raw edges, stretching the waistband to make it fit. Once you have them fitting nicely together, sew them together. Stretch the waistband as you sew to make it fit nicely onto the skirt.

Finish the raw edges any way you like, but since it's knit cotton, you shouldn't need to if you don't want to. If you have really stubborn fabric in your waistband that keeps stretching out and making the skirt not stay up, you can sew some elastic onto the raw edges to hold it in place.

And Voila! You've made yourself a brand new skirt!

* To anyone wondering about the AMAZING top I'm wearing in the first pic, it was done by my the incredible Scott at Tied up and Dyed on Gabriola Island. You can visit his website here, or catch him at all the summer farmers markets on Gabriola. I love LOVE his work for how intricate it is, and how classy he can make tie dye. I wore this shirt to the office and my co-workers were in awe of it. So am I!

Tuesday, March 30, 2010

Jackpot!!

I hit the free fabric jackpot this weekend! One of the wonderful ladies at work used to be employed at Fabricland (one of my dreams when I was a teenager - the closest I ever got was to work in their call center...). While there, she acquired quite a bit of fabric that was just sitting in her closet for the last 10 years. When she found out I could sew, she offered to give it to me. ALL OF IT!!!

I was speachless. There is sooo much, I don't know where to start. There are lots of heavier woven synthetics that I probably would never have thought to buy, but now that I have them, I'm dying to experiment and see what I can do!

I loaded up my big backpack and had a second tote bag in my hand. I had to carry it all back on the bus... When I put it away at home there were 5 grocery bags stuffed, and I mean STUFFED with fabric. My favourite is this great little woven cotton with asian river scenes. So beautiful!

Completed projects will be posted! I just hope I have time to finish a few of them before I head to Baffin Island in May...

Wednesday, March 24, 2010

My Obsession with Gluten-Free Cookies, or I'VE COME UNGLUTENED


I have a problem. I can't stop making gluten-free cookies from my friend MiaHalf's recipe's here. They are ridiculously freakin good to eat.

This is a problem for the following reason:

It's easy to convince myself they are healthy since they contain no wheat or white sugar, and are rich in nuts and fruits. They still contain sugar in the form of molasses or honey. Probably more than I should be ingesting when I convince myself that these cookies constitute a meal.

Unfortunately, I also have several friends and co-workers who don't or can't eat wheat due to allergies or disease or just diet choice, so I tell myself I'm doing something nice for them. However, I usually eat most of the cookies myself.

The ones pictured above were a slight variation on the apricot almond cookies, using dates instead of apricots. These were my boyfriend's favourite.


My favourite are these molasses macaroons. My last batch burnt a little :( They are not as sweet as normal cookies, and the bonus is that they have nutritional value (other than just sugar). This results in them actually making you feel full, so there's no chance you'll eat a whole bag of them and still feel hungry. Their affects on my figure remain to be seen...

Sunday, March 21, 2010

Haramaki and Underwear Galore!

Today, I spent the day sewing like crazy! I made the above 3 pairs of panties from old T-shirts (the two Spiderman pairs were from a single shirt). The old Tinkerbell shirt I have had for years, and it has been a part of so many different projects... I'm not sure how long these underwear will last, but there are so many memories associated with this shirt that I just couldn't help myself. Some detail on the Tinkerbell are below:

She's just a little bit faded...

I also took the White Queen costume from last week, and made the bottom into a little slip. It was the only part of the original costume that really fit me well - I'm happy with how it turned out! I just cut the original slip, folded the fabric over some elastic and sewed the whole thing together with a zig-zag stitch. Voila! Insta-slip!


I also made an old black T-shirt into a tank top (straps yet to be added). When I make tank tops, I like to buy the adjustable bra-type straps to use (or just scavenge from old bras). It always seems to me that tank top straps always stretch, and I hate that, so this is my way of avoiding that.

And, the piece de resistance of the day is my new haramaki! What is a haramaki you ask? A haramaki is a piece of japanese fashion that has been around since the time of the samurai. It's basically a belly warmer - a tube of fabric that covers your mid-section from your hips to your ribs. I fell in love with the idea a while ago, and let me tell you why:

I'm tall. At 5'8", I'm not exceptionally large, but most of my height is in my midsection. As a result, shirts are pretty much never long enough for me. Add to that the fact that I don't like the waist of my pants to be too high, and I am pretty much constantly showing off a circle of flesh around my midsection. Not too pretty, especially from the rear...

Enter the haramaki. It can be worn under the clothes so that if ever that area between the shirt and the pants peek through, all that shows is a little pop of colour. It can be worn over the clothes as a focal point. They are wonderful for those expecting, because they will cover the part of the body left exposed by ill-fitting T-shirts.

I really love the colours of this one I made - reversible yellow and orange. Both colours come from old T-shirts, and I love the way they look together. Makes me want to eat citrus...


Tuesday, March 16, 2010

Wool Coat is Complete!


Yay! I finally finished my coat... now that the weather's warming up in Vancouver :)

This is the first big project I have completed in a while, and I am very happy with how it turned out. This is also the first coat I have ever made!


My favourite part about this coat has to be the buttons. They caused me some grief as the buttons I had originally bought didn't go that well with the leather - but then I found these vintage faux wood numbers at Button Button and fell in love! The only problem was that the buttonhole attachment for my sewing machine didn't make buttonholes large enough for my buttons to fit through... there are fancy buttonholes with no stitching showing (not sure what these are called any more...), but they take a lot of time and I don't think they would work with such thick fabric. So, I just put my machine on a zig-zag stitch and did them manually:


To say the truth, I think I prefer this to the machine made ones, as I have more control. My machine is probably older than I am, an I have never been fond of the buttonhole attachment.

I also had a moment of panic when I tried on the coat after putting on the buttons and had a thought that I looked like a clown... No idea where it came from, but after I saw it, it wouldn't go away. I asked my boyfriend, and he unwisely agreed with me, so I had to continue to panic until his sister came over and assured me that the buttons looked great. I now love them again!


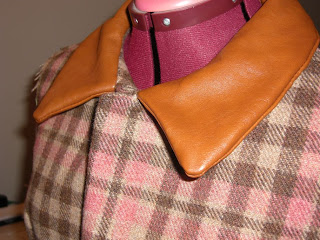
Other than that, I pretty much followed the pattern. There are lovely hidden pockets in the front seams, and I'm really happy with the cream coloured lining. I wound up adding an extra line of stitching to make the collar sit right. I have a horrible time remembering which side to sew the upper collar to, and which side to sew the under collar to, and I seem to get it wrong every time - this was no exception. Unfortunately, you can't re-sew leather without destroying its integrity, and so the collar remained upside down. This may have something to do with it sitting funny... Hopefully I won't make that mistake again, but it looks good the way it is.

I can't wait to wear it tomorrow!

Monday, March 15, 2010

Amazing Letterhead!!


I found the most amazing letter paper at the dollar store today! It's Korean, and I can't get over how ridiculous it is. Most of the paper is taken over by that amazing image. Here's a close-up of the detail at the top:


And here is a close-up of the little stickers that come with it.
My favourite is the happy little dear leaping in front of a rainbow in the upper right-hand corner. You can't read it in this image, but the text below it reads: "Don't Touch Me"!!!

Sunday, March 14, 2010

White Queen and Adventures in Matching Plaid

On Friday, my friend had an Alice in Wonderland Dress Up "tea" (aka booze) party. I had just gotten back from Maui (that's right, you're jealous) and I thought I was going to have no time to throw together a costume, but felt inspired at the last minute. So, I went out and bought a white slip and a ton of lace and made the following costume:

I can't believe how well it turned out considering how last minute it was. (See the real White Queen here) The only serious downside was that the wonderful tan I picked up on vacation really didn't help the costume. In fact, I think that with the blonde wig it made me look more like a drag queen than anything. Also, white is not my colour.

I also had to throw together a costume for my boyfriend at the last minute. I was inspired by this post I found through the Craft Magazine blog while at work, and so I "Recycled" a couple of filing folders into a Dormouse mask. It took 15 minutes to make!

He looked so adorable with it on, too.

I also have had some time to work on my wool coat, and I love how it's turning out. I bought all the fabric they had left on the roll, and boy am I glad there was 0.6 meters more than I needed. Plaid that big is a BITCH to match. I double checked the match before I cut anything out. A good thing too, because I caught some mistakes. I also had to re-do so many seams because the plaid was just a little too much off.

I learned something while cutting out the fabric. I have a new rotary cutter and self-healing mat (so nice!) that I was using to cut out the pattern, and I learned the hard way that rotary cutters do not work well on pattern paper! It does not cut with a soft background like fabric, it TEARS! Cut out the pieces to fit you before placing them on the fabric!!

Sadly, I finally cut into my lovely leather coat to make the collar. I like how it matches, but I think I need to add some stitching to make it sit right. I also had to go and buy new buttons to match with the leather, since the original ones didn't quite look right.

With a little luck, the coat should be finished in the next day or two. Now, I'm thinking I will have to make a matching wool-and-leather purse with the leftover fabric.