Thursday, December 23, 2010

Christmas Drinks and Decorations

Christmas is right around the corner, and I hope everyone has a wonderful holiday season. I personally plan on making up a batch of hot apple cider for the family, from this wonderful recipe care of Elana's Pantry. I feel like I have to try her Thai Vegetable Soup one of these days as well...

Last year I made egg nog from scratch - it's delicious. There are TONS of recipes online - here is a good place to start.

I also love this Christmas Tree Ornament Mobile from Not Martha. I wish I had known about it sooner - this would be perfect for the corner of our little apartment. Maybe for next year.

Wednesday, December 22, 2010

Chii's Sweet Home


My boyfriend has introduced me to the most adorable manga ever... Kanata Konami's "Chii's Sweet Home" describes the world from the point of view of a kitten as it discovers it's new home.

Oh my god, this thing is distilled cuteness. You feel like you are the little kitten figuring out how things work.

You can read it from the beginning here on Manga Fox. WARNING: It is highly addictive!

Sunday, December 12, 2010

Thomas Barbey Photography

Thomas Barbey "Tourist Trap"

I have recently discovered the amazing work of artist and photographer Thomas Barbey. His photography has such an ethereal feel, and he uses incredible imagery. Most incredible is the fact that they are not photoshopped.

Thomas Barbey "Night...Mare"

Barbey uses film and negatives techniques like double exposure and re-photographing collaged photos to create the final product.
Thomas Barbey "Sunbathing"

The above is my favourite image. Ever since I was little I have always wanted to live underwater. I have seen every version of The Little Mermaid (the Disney version is the only one where she lives in the end... HUGE disappointment for anyone who loves the story...). I think "Sunbathing" captures what, in my mind, it would feel like to live below the waves...

His works can be found on his website here - well worth a long look through!

Friday, December 10, 2010

Super Easy Cat Toy!

If your cat is anything like mine, they love those little mice that rattle and cost abot $1 each. If they're really like my Daphne's, then they'll disappear into some corner or under a bit of furniture just about as soon as you bring them home.

Well, I got so tired of having to bring these home that I decided to make my own out of scraps I had lying around. I was inspired by this post on Design Sponge for an even simpler toy, but I don't think my cat would go for it...

Materials and Tools:
-Scrap Fabric (knit or stretch fabric works best)
-PVC pipe (3/4" diameter)
-thick paper or cardstock
-rice, dried beans, beads or anything else that will rattle
-tape
-scissors
-pipe cutter (or hacksaw)

I used jersey knit fabric left over from an attempt to make t-shirt yarn. I wasn't happy with the way the yarn knit up - I thought it was much too stiff once knit. So I had long strips of yarn about 1.5" wide just waiting for a project.

Step 1:

Cut a 1.5" length of PVC pipe using a hacksaw or pipe cutter if you have one. Tape a piece of thick paper over one end to seal it up.

Step 2:

Add about 10 grains of rice (or beads, or whatever) to the pipe to rattle around, than seal up the other end, Tape it all together really well.

Step 3:

Take a long strip of fabric and tie it around the middle of your pipe/rattle, leaving a "tail" of about 4". Position the tail so that it is hanging out one end and begin wrapping the longer strip of fabric around the pipe/rattle. Keep wrapping the strip of fabric around the pipe until it's completely covered, then cut of the rest.


Step 4:

Cut a strip of fabric about 8" long and tie it around the pipe, holding the loose end that you had wrapped around it in place. Make a knot to look like a pair of ears. Cut off any extra fabric.

Step 5:

Play with your kitty!

You could probably add catnip to these (just wrap it up in the fabric), but my cat doesn't actually really like catnip for some reason...

Here's a great site for other ideas on how to make cat toys. There's even a video for how to make a toy out of your cats own fur...

Tuesday, December 7, 2010

Handmade Holidays - Gift Wrap

Today's post concludes my tutorials series - I hope someone has found these useful and inspirational. I'm leaving for a winter vacation in a few days, so this blog may get a little quiet for a couple of weeks. I hope everyone has a happy handmade holiday!


Martha Stewart has an idea for wrapping cookies shipped to a loved one this holiday season.

And also for wrapping coins. This would be a great stocking stuffer for anyone like me who is always running out of laundry change...


Here's a simple way to make your own gift bags from newspaper (from How About Orange). I think these would also look nice if you used the paper as a base and covered them with fabric...

Also from How About Orange, some surprisingly lovely bows made from recycled magazines, etc.


Zakka Life has a great tutorial on making decorative knots for gifts from mizuhiki cord, though just about any stiff cording would work.

Martha Stewart, of course, has lots of ideas for making your own gift wrap.


Furoshiki is a japanese art of folding fabric. It is often useful for wrapping gifts in re-usable fabric squares, and I use it myself. This site has tons of versions of fabric gift wrap and other uses for furoshiki. Here's an ehow article on making the fabric wraps - I think 24" square is standard.

Happy Holidays everyone!

Monday, December 6, 2010

Handmade Holidays - Reading and Writing

Today's post is just a quick one with a couple of reading/writing themed tutorials.

I love A Little Hut's stationery set. Using security envelopes for decorative purposes makes me look at the ordinary things around me in a whole new way...

Here's a printable pattern from Keep and Share for book marks that kids can colour and use:

Tomorrow: Gift Wrap Tutorials!


Sunday, December 5, 2010

Handmade Holidays - Clothing and Accessories, Part 2

Continuing from yesterday's post, here are some more tutorials for handmade gifts of clothing and accessories.


Here's a cute little Kut Out + Keep tutorial to make a small pouch for a mirror or make-up, etc.

And another for a chained pearl bracelet.

Here's a cute sewn handbag from Little Girl Pearl.

This Anthropologie inspired necklace from Mrs. Priss uses some neat techniques and is quite lovely.

Here are a couple of tutorials for making chandelier earrings: There's a Youtube video, and a Making Beaded Jewelry tutorial.

This “falling water” necklace from Paper 'n' Stitch is also lovely, and has such an organic feel to it.

Saturday, December 4, 2010

Handmade Holidays - Clothing and Accessories, Part 1

Todays tutorials are all about clothing and accessories. There are so many ideas out there, it's really difficult to choose. I love making jewelry, myself, but handbags and winter accessories are also good choices for the right person.

This Nuno felted scarf from Catherine et les fees looks like a lot of fun to make – and the design ideas are nearly endless! I want to start felting just to try making one of these!

Julie's Blog has a tutorial for some simple and cute felt flower hair clips.

I'm a little wary of heating plastic, but I won't get into the debate. If you're alright with it, then here's a super cute way to recycle normally non-recyclable plastics into cute charms for earrings or necklaces (from Dabbled).


Here's a great tutorial from Until Wednesday Calls on how to make a cute scarf from an old pair of pajamas, though scrap fabric would probably work just as well.

These bangles made from vintage maps are so lovely. I have also seen a version of these where the bracelet itself is made from a slice of an old shampoo bottle, then wrapped in scrap T-shirt fabric, though for the life of me I cannot find the tutorial.


Friday, December 3, 2010

Handmade Holidays - Decor, Part 2

Here's a continuation of yesterday's tutorials for home decor gift ideas. Enjoy!

My sister and I made a whole bunch of these little magnets – they are really easy and super cute. I found an old homemakers encyclopedia, and the images from it were perfect! The tutorial's moved around a bunch, but Not Martha has a really good post on them.

While you're at it, you can also make these button magnets from the Happy Home. We did.

Here's a cute little photo cube from Instructibles.com for displaying numerous images of loved ones in a small space.

These paper flowers from Housewife Eclectic are just too beautiful for words! I would love to receive a bouquet of these!

Here's a link to a Spool pattern for a simple sewn decorative bird.

These little patchwork baskets look so handy. I want to make some for my recyclables – then I can take them out to the bin, toss them in, and roll them up to stick in my bag when I head out for work. No mess, they stay open, they won't take up much space, and I won't need to make a special trip to the recycling bin.

Here's a simple but delightful paper and twig centerpiece for entertaining from How About Orange.

This is a really cute idea from Sandy's Space for organizing ribbon.

And some lovely kitchen decals from Just Something I Made.

Thursday, December 2, 2010

Handmade Holidays - Decor, Part 1

Many of the tutorials I received were for home decor items, so this will be a two-part post - the rest will be posted tomorrow!

Here's a tutorial for some pretty candles from Martha Stewart.


Here's a tutorial for a gift recipe tin, also from Martha Stewart.

Just Something I Made has an adorable tutorial for cute decorative houses and all sorts of ideas for using them. I love the idea to use them as stamp dispensers. Very useful to us swappers...


The Little House by the Sea has a pattern and tutorial for such cute little felt mushrooms!

My Little Mochi has a great tutorial for making little bowls that snap together when you need them, and lie flat when you don't. Great for people (like me) who don't have much space.

I don't know about you, but party crackers are always present during the holidays at my boyfriend's family's home. Here's a tutorial for making them from Not Martha.


Or, here's an idea for making gifts out of egg shells.

Here's another cute use for eggs as vases from Design Sponge (one of my new favourite sites – I can't stay away!).


Here's a pattern for some lovely little paper flowers from Folding Trees.

Wednesday, December 1, 2010

Handmade Holidays - Bath and Beauty

Who doesn't love to pamper themselves with a nice long soak in the tub? It's the perfect way to relieve holiday shopping stress here is a set of tutorials for making body-pampering gifts for those in your life who love to/could use to slow down and take some me-time.

I love making bath products, and here is a series of tutorials from Martha Stewart on how to make some of my favourites. Bath fizzies are always well received, and are pretty simple:

Body Scrub
Bath Salts - a simple variation on the bath salts is to mix your salts, then open up a peppermint tea bag and mix in the dried mint leaves for a peppermint soak. This is a great refreshing soak for the feet after a long day of work.
Lip Balm - add a few drops of Vitamin E and lavender for a healing lip balm, or peppermint for refreshing balm.
Bath Fizzies

Life With Monkey has a great tutorial for sewing your own hair curlers. This is genius!

Tuesday, November 30, 2010

Handmade Holidays - Gifts for Kids

For those who have kids in their lives, here is a handful of gift ideas for the little ones.

Here's a cute little tute for a baby doll sling from Domestic Dork.

I Love to Create has a cute little tutorial for making a puzzle with pictures of distant loved ones.

Of course, Futuregirl's Sigmund the Octopus is always an adorable choice for the kids.

Keeping with the water theme, here's a tutorial for a kid's aquarium (for that child who may not be able to care for their fish...)

Here's a Martha Stewart tutorial for making snap-on felt appliques for kids clothes.

These elf slippers from Maya Made would be great for the child (or child-at-heart) in your life.


Monday, November 29, 2010

Handmade Holidays - Kitchen/Food, Part 2

Here is the second group of kitchen and food gift tutorials. The problem with posting these is that they always make me hungry...

Not Martha has a tutorial for an adorable little gingerbread house that perches on the side of your mug of hot chocolate (or hot toddy...)

I love hot chocolate during the holidays, and hot chocolate spoons, like these from Do It Yourself Gifts, are great little gifts.

For those who like chai, why not make your own? My boyfriend has been making his own for years, partly from spices my mom brings back from the middle east – it let's him really control the spices and make it just to his taste. Here's a recipe from Tasty Kitchen to get you started. What a lovely gift!

Another lovely idea form Tasty Kitchen is making your own vanilla extract. Great for the foodie in your life!

Know someone who wants to cook, but can't bring themselves to gather the ingredients or recipe? Make them a gift of cookies in a jar, like these from about.com.

Along the same lines, Urban Threads has a recipe for gingerbread in a jar, as well as cute gingerbread men Christmas ornaments.

Sunday, November 28, 2010

Tutorial - Easy Felt Holly Cards!

These felt holly holiday cards are super easy to make - complete instructions after the jump!

Materials and Tools:
-felt (green and red)
-matching thread in green and red
-sewing needle
-scissors
-card stock in desired finished card size

Step 1:
Cut out two pieces of green felt in the shape of holly leaves. You can wing it or draw a template on some scrap paper and follow that. Cut out a piece of red felt shaped like three berries.

Step 2:
Arrange the felt pieces on the card to decide where to attach them.

Step 3:
Thread the needle with the green thread and make a large knot in the end. Pull the needle through the first holly leaf so that the knot is on the side that will be facing the card, near the end that will have the berries. Doing this, the knot will be hidden behind the leaf.

Step 4:
Sew the leaf to the card down the length of the leaf, stopping short of the end. Make sure you use long stitches as the holes formed in the card will weaken it.


Step 5:
When you get to the far end of the leaf (I like to stop about 1 cm from the actual leaf tip), make a knot in the thread on the back side (inside of card). Once the knot is made, thread the needle and remaining thread back to the front of the card. Cut off the thread as close to the card as possible. This will hide the end of the thread.

Step 6:
Repeat with the second leaf, securing it in place.

Step 7:
Attach the berries in a similar way, working the stitching from the center of the berries to the indent representing the divide between the berries. This will add definition, making the felt look like a cluster of berries. Secure ends with knot similar to the leaf.

Step8:
Enjoy your work and share with loved ones!

Handmade Holidays - Kitchen/Food, Part 1

Edible gifts are great for just about anyone on our list who we can't think of what to get them. Everyone eats, and everyone appreciates tasty treats, especially when well-presented.

I got so many tutorials for food and kitchen items, I'm going to split them into two batches.

These lovely cookies from Toads Treasures could easily be adapted to the Holidays – some gingerbread wrapped up with cute stickers... could be fun!

I have always wanted to try making mulled wine, but have never gotten around to it. Well, Martha Stewart has a simple tutorial for making mulling sachets as a gift:


This cast resin tray from Chica and Jo gets my creative juices flowing...

Nigella's recipe for chocolate pistachio fudge sounds mouth-wateringly good...


Here's a cute idea for a cupcake bouquet from Carrie Rousseau. Frost them green, and it will look like a topiary!

These handmade sewn bowl covers from Collecting the Moments... are a fantastic idea. My grandmother uses shower caps, but they are such a pain in the butt to clean...

Come back tomorrow for more kitchen tutorials!

Saturday, November 27, 2010

Goodbye Desert Bus

Well, another Desert Bus for Hope has come and gone and, once again, the folks at Loading Ready Run have raised and unfathomable amount for Child's Play. As of today, the total is over $197,000 and counting, and the boredom of Desert Bus went on for a ridiculous 141 hours.

Thanks to everyone who donated to help the kids and torture the players. My silly little underwear raised $125. I think next year, now that I know about the craft along, I'm going to start sooner and make something a little more involved. Also, I'm going to try harder to win the auctions I want, and not let another awesome set of sushi plates slip away from me. Helen, they are beautiful.

But most of all, thanks to those crazy kids at LRR for putting themselves through this. Also a quick thanks for the mention of my blog!

Handmade Holidays - Holiday Decorations

This holiday season, I have decided to make most of my gifts handmade. This wasn't a conscious decision, but when thinking of what each person would like, in most cases, something really personal and handmade came to mind. Unfortunately, I clearly can't post those gifts here, or the recipients would lose the surprise.

Luckily, I have been exchanging handmade ideas with my swap-bot partners, and have a huge list of tutorials that came from everyone. I'm going to post a handful a day, separated into categories, so that I can share them instead.

I decided to start off with some holiday decorations to get everyone into the holiday spirit. Enjoy!

Here's a cute little advent calendar from Martha Stewart made from baby socks.

Or, Freshly Pieced has a tutorial for making a wall hanging advent calendar. She even sell all the fabric to make it in one custom fat quarter, though it may be a little late to order and make in time for Dec 1.

Eat Drink Chic has a tutorial for some adorable little holiday goodie bags.


Jolly Allsorts has a cute tutorial and pattern for a decorative felt Christmas tree.

Here's a tutorial for making a lovely little money tree from Do It Yourself Gifts.

These Dorset buttons from Trish Alan make adorable Christmas decorations.

I love these flower ornaments made from recycled paper towel tubes from Michele Made Me.

Sunday, November 21, 2010

Blocking Scarves

The reversible cables scarf is finally finished!

I never really understood the importance of blocking scarves until I read this tutorial from Craft Nectar on how to block a scarf. While blocking the reversible cables scarf, I went back to my previously made scarves and pulled out the green one in the picture to re-block it. I didn't understand the importance when I created it several years ago, and so had just hung it over the shower curtain rod to dry. As a result, it hung in a very awkward shape, all wrinkled and fanning out at the ends.

I made this scarf to test my knitting skills, and I'm pretty proud of the lovely leaf pattern on it. There are a few problems with it - mostly that it's too short. I bought the yarn at a second-hand shop - there was a whole bag of this stuff - and so, could not get any more of it.

I also failed to notice until the scarf was nearly complete that the two balls of yarn I used to make it were actually slightly different colours - one of them has brown accents, while the other is gray. It's pretty subtle, but it bothers me whenever I take a close look at the scarf. All the same, I put A LOT of work into this scarf, and there is no way in hell I'm going to undo it after all that work...

Saturday, November 20, 2010

Desert Bus Begins!!!

Desert Bus for Hope has finally begun, with all proceeds benefiting Childsplay. Be sure to check out all the awesome crafts up for auction, or make a donation and see how long they can play the worlds most boring video game!

Wednesday, November 17, 2010

Coraled Earrings

Now, I don't do a whole lot of beading, but when I stumbled across this tutorial for how to make beaded earrings using the coraling technique, I had to try it. The finished product looks so organic and elegant. I don't think they turned out half bad for a first try!

I am so lucky to live right around the corner from Country Beads...

Tuesday, November 16, 2010

Cupcake Pincushion!


I made this little cupcake pincushion from scraps I had around. It's mostly felt and stuffed with fabric scraps. All the little "sprinkles" are stitched by hand (I've been watching a few movies to pass the winter blahs). The creases in the cup are made by sewing thin pleats, slightly thicker in the bottom than near the top, so that it flares out.

Best of all, it has a wrist strap to keep your pins nice and handy!

Thursday, November 11, 2010

Felted Phone Cozy

I bought a pile of Nashua Creative Focus Chunky wool yarn in "Emerald" a while back with the idea of knitting up a cute little cardigan, mostly because I REALLY love the colour. The only problem with it is that it sheds bright green fibers all over the place. Seriously. Whenever I worked with it, I would be covered in green fuzz. I found green fibers all over my apartment, and they even started popping up in other places. Like my office...

So I decided to unravel what's been made of the sweater and save myself getting covered with green fuzz all the time. But what to do with all that lovely green yarn.

It sat in my project pile for months and months, and then I thought - maybe if I felt it, the fibers won't come out so much. This phone cozy was a test (I also just bought a new phone). It felts beautifully, and the fibers don't come out as frequently as before, but they still do.

I'm thinking of knitting the rest up into a felted messenger bag. I'll add that to my to-do list...

Tuesday, November 9, 2010

More Crafty Links

I was recently directed to the free 42 ways to recycle e-book here. It's full of projects to make out of items we throw away every day - after my own heart!

In the direction of my ever hopeful, here is an awesome tutorial for a super simple skirt. I love making pencil skirts out of jersey knit, but hadn't yet found the best way to make a waistband - this may just be it. Shirring is super simple and I have loved the look of it since I was a little girl. I want to make about 5o of these skirts...

I just discovered the knithacker website. Some of the projects posted are so amazing!

Many people I probably won't have to say anything about this, but I have also discovered Craft Leftovers. How has this site escaped my attention until now? So lovely!

Sunday, November 7, 2010

Reversible Cables

I've been reading about reversible cables lately and thought I might try my hand at it. The trick to reversible cables is to make them in 1 x 1 rib knit. The cable will then look identical from both sides.

This scarf is made in Nashua Wooly Stripes in "Eathy" and is knit on 5.5mm needles. The pattern is simple:

Cast on 31 stitches. (K=knit, P=purl)
Row 1: K 5, *(P 1, K 1) four times, K 5. Repeat from *
Rows 2 through 7: Repeat row 1.
Row 8: K 5. Place 4 stitches on cable needle and hold in back of work. (P 1, K 1) twice. Place cabled stitches back on needle. (P 1, K 1) twice, K5. Place 4 stitches on cable needle and hold in front of work. (P 1, K 1) twice. Place cabled stitches back on needle. (P 1, K 1) twice, K5.
Repeat rows 1 through 8 until desired length of scarf is achieved.

Friday, November 5, 2010

Spray Painting Fabric!

I finally made myself a new shirt using the pattern I made a couple of weeks ago, and I'm really happy with the results.

I decided to add a pattern to the fabric by laying some lace over it and then spray painting the whole thing - the spray paint passes through the holes in the lace, and you're left with a negative version of the lace pattern. The picture above is one of my test swatches.

Spray-painted fabric is surprisingly durable in the wash - I just throw mine in the washer and dryer with the rest of my clothes. It will probably fade over time but, really, I can always make a new one!

The only downside I have found is that sometimes you get a lingering scent of spray-paint coming off the shirt, but I'm sure that will fade after a handful of washes. I am so happy with the way this project turned out!


Thursday, November 4, 2010

Modular Origami Night


Moday night was Modular Origami Night at the Vancouver Hackspace, and it was so much fun! We each made on of the dodecahedrons (twelve-sided bodies) above. They are tough until you understand what you're doing, then it's mostly just repetitive, but the paper's colourful, and the company was great.

Each dodecahedron takes 30 sheets of origami paper to complete, and about 2 hours of your life, but they are beautiful and totally worth it. I'm not entirely sure where I'm going to display mine - I'm thinking I might bring it to my office at work, but I get some interesting comments from people when I take it on transit!

I kind of like it displayed on my Iqaluit carvings. By pure chance, it wound up in the display with our origami from Heavy Rain...

On a completely different note, this recipe sounds amazing. I want some right now: Baked Sweet Potato Fries Recipe.

Tuesday, November 2, 2010

Fun Crafty Links


As soon as I saw this post on how to make felt flower arrangements, I fell in love. Normally, I don't like fake flowers, but I suddenly find myself wanting oodles of these all over my apartment...

I love the Blue Mollusc blog. Lovely projects and writing!

I am seriously digging this crochet top. I don't quite think I'm ready to make fitted clothes yet since my gauge is all over the place, but when I am, look out!

I want to make myself a felted hat like this one, though without the frilly accents.

I love the clothes and photographs at Vintage Vivant. So lovely! I love the vintage style, and I think my new hairstyle calls for a little more 20's inspiration in my wardrobe, but she just pulls it all off so well...

I also love these sock lights. I'm getting many ideas on how to make fabric lampshades...

Sunday, October 31, 2010

Happy Halloween!

Ah, Halloween. I love thee greatly, but I sadly had little time for thee this year.

Most of my Halloween projects this year were taken from amazing projects found online. I made a pair of sock zombies following Becky Stern's tutorial on the Craft Blog:

I gave one to a friend as a thanks for taking care of our cat when we were out of town and kept the other for myself. The socks I used have had holes in them for ages, and I actually was using them to clean the kitchen for the last little while. I love the fact that even rags can be reincarnated as awesome zombies!

I also made these amazing chocolate tree cupcakes from Cheeky Kitchen. My boyfriend makes amazing chocolate cake, and these were no exception.

I was hoping for the icing to be as orange as Brooke's, but I ran out of red food colouring, so they were a little pale.

The trees were easy to make. My only beef with them is that they get soft at room temperature. Instead of letting them harden on the table, I put them in the fridge and they were hard when I checked back about 15 minutes later. But they started to droop when I stuck them in the cupcakes and let them sit for a few minutes. Granted, my friend's apartment where I put them together is always a little on the warm side.

I wanted to bring the cupcakes as a gift to thank them for hosting the party, but we also traditionally bring them booze to stock their tiki bar (yes!), so I made some Irish Cream as well. I forgot to take photos of the bottle I gifted to them, but luckily, I still have some leftover for myself!

There are numerous recipes for Irish cream online, and the one I use has been tweaked a little, but is basically the same thing. Let me tell you, it is delicious (and easy)! Here's how it's made:

Ingredients:
-1 cup whipping cream
-1 300 mL can sweetened condensed milk
-1 cup Jamieson Irish Whiskey
-1 tsp instant coffee crystals
-2 tbsp chocolate syrup
-1 tsp vanilla flavouring
-1 tsp coconut flavouring

Directions:
Throw all ingredients in a blender. Blend on high for 20 seconds. Done!

This recipe will make roughly 3.5 cups of Irish Cream, and should be stored in sealed containers in the refrigerator. You may need to shake it a little before pouring. I think it can be kept for a couple of months, but honestly, I've never had it sit around quite that long.
Best enjoyed on its own over ice.

If you prefer stronger Irish Cream, you can add more whiskey, and it will probably store longer that way. I think the alcohol threshold for preventing the growth of bacteria is around 20%, meaning your Irish Cream would have to be half whiskey and you'd be able to store it on the shelf instead of the fridge, but that would probably be a bit too strong... Also, don't take my word on the storage thing.

Here's a photo of our Margot and Ritchie Tenenbaum costumes, sadly missing the signature fur coat (it was way too warm in there for fur). Last-minute, but fun costumes nonetheless.

Saturday, October 30, 2010

How I Relax

One of the things Mike and I love to do to chill out is that I will work on crafts while I watch him play video games. I love games, but I'm not nearly as good at them as him. He is THE video game nerd. He and his friend will get together for video game marathons, and he's the one they pass the controller to if there are areas no one can get through. It's pretty amazing to watch sometimes, and it's nice to live vicariously through him. I have to admit, I also do a little "backseat gaming" from time to time, yelling at him when he goes the wrong way...

One of the advantages of borrowing his parents home for part of our vacation was their huge television. It's ginormous, really. We had purchased two games to bring with us on our vacation - Castlevania: Lords of Shadow, and Kirby's Epic Yarn. This game is amazing "Gabe" from Penny Arcade commented in a post that "If you have a Wii this is a must own game. It might even be reason enough to get a Wii if you don’t already have one", and I am in full agreement.

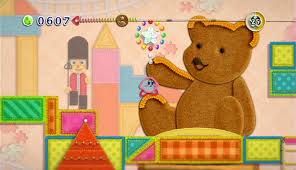
As either a gamer or a crafter, you would pretty much have to have been living under a rock to have not heard of this game, but here's the idea: Kirby has been turned into yarn and is making his way through a world of fabric, yarn, string, buttons and beads with his sidekick Prince Fluff to stitch Patchland back together. It is amazing!

The best part for us is that it is a two-player cooperative game. I am extremely competitive when I play games, and I think Mike gets tired of me trying so seriously to beat him at everything. The cooperation in this game is really fun, too. It's much better than in the new 4 player Super Mario Brothers, where you just end up getting in each other's way. Some have even nick-named it the "divorce game"...

In kirby, the enemies are fun, the items you collect are really funny, the graphics are total eye candy for any crafter, and even some of the music is really good. I loved it and recommend it for anyone out there.

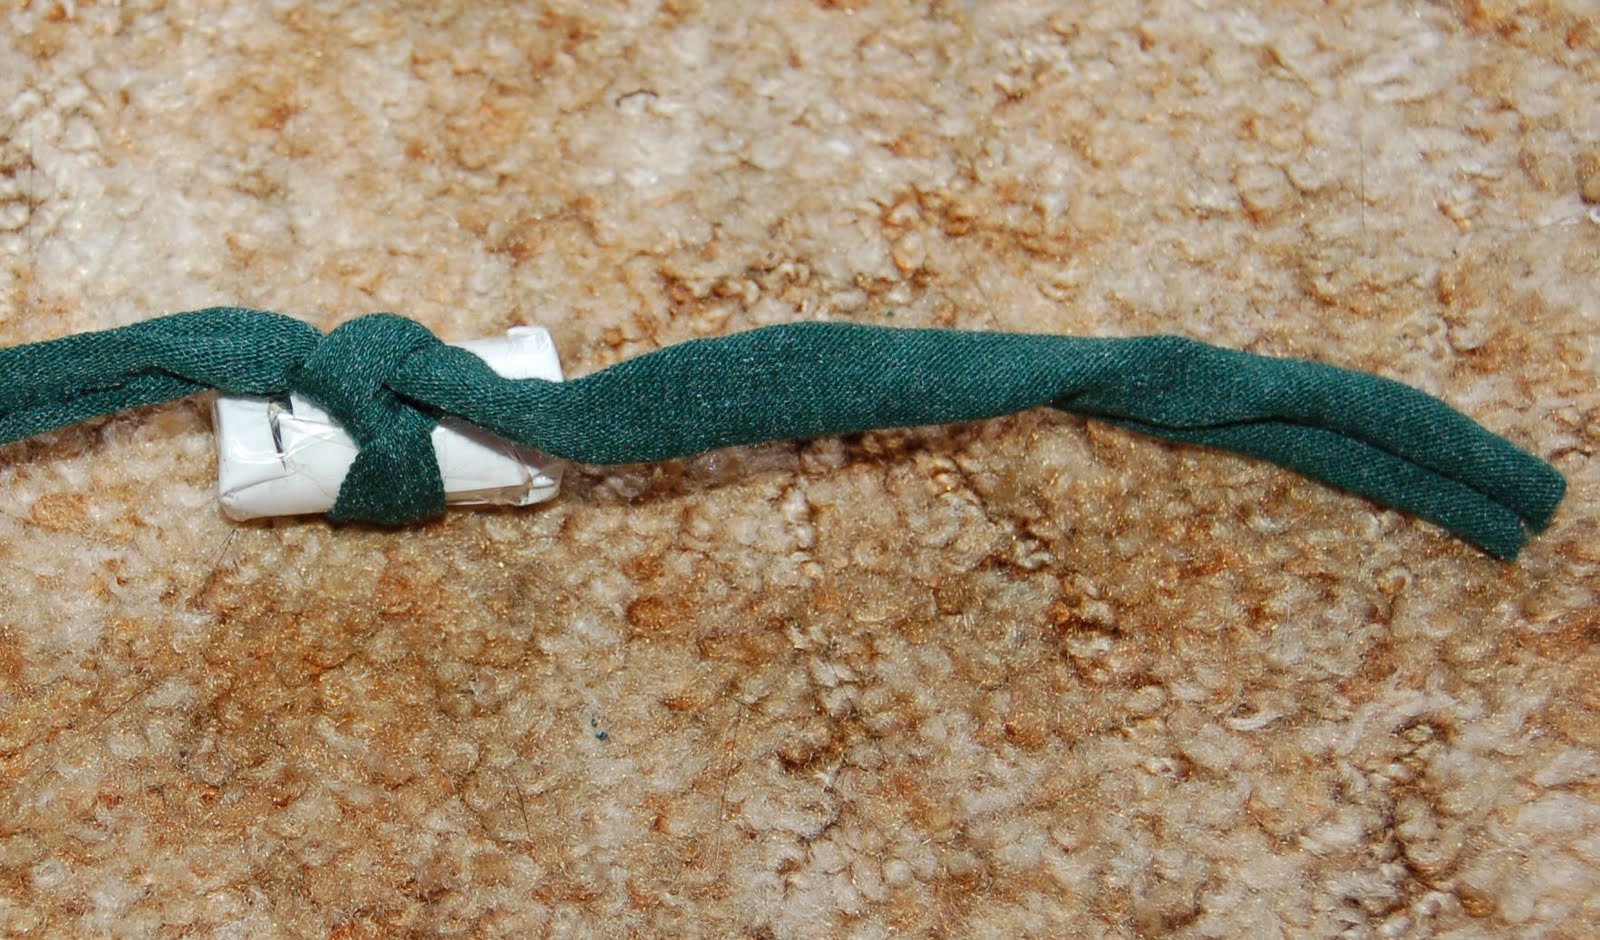
The new Castlevania, Mike seems to like, but he's always been a fan of the series. I have a few issues with the graphics in some places, but it's otherwise entertaining to watch. I at least got a lot of crafting done. I finished a cowl I had been working on for a while with some amazing blue alpaca/silk blend yarn that was a Christmas present last year.

I also finished my first ever granny squares for a patchwork blanket swap. I love how much the textures change just by adding an extra row of each colour in the square!

We go out and enjoyed the temperate rain forests during one of the brief periods of sunshine we get this time of year. The paths were overgrown and beautiful, and there were mushrooms everywhere! I leave you with a couple of photos; I love the wet coast!


Friday, October 29, 2010

New Blog Design

Well, I finally learned a little more about Blogger and managed to fix a few of the issues I had with this blog. Aren't the colours pretty? I took them from the most unlikely of sources - Iqaluit in the summer. Traveling in the Arctic helps you appreciate the small things. Mostly because nothing grows higher than your ankles, but I digress.

Unfortunately, these changes meant that I had to say goodbye to my beautiful banner *sigh*, but I think it was time. I do believe that the positives will outweigh the negatives.

Thursday, October 28, 2010

The Making of a Drop Spindle

So, I am finally getting around to the post about how I made my drop spindle. We were both sick for a very long time and burnt out from a crazy summer of work, so we took a vacation and borrowed Mike's parents house in the "hills" for some soaks in the hot tub and walks in the woods. A very much needed vacation indeed...

Anyhow, I gathered a bunch of supplies from around the apartment and made it for pretty much nothing. I apologize for the fuzzy photos, the light was not good.

Necessary tools and equipment:
-pencil (with eraser on end)
-a sewing pin
-piece of cardboard about 4" square (size not critical)
-sandpaper (both for metal and wood, grit not important)
-scissors
-white glue
-wire cutters
-pliers (flat- and round-nosed)

Step 1:
Push a sewing pin into the eraser end of the pencil

Step 2:
Cut off the head of the pin with the wire cutters and sand the cut end smooth. Use the flat-nosed pliers to bend the pin 90 degrees near the eraser end, then curve it into a hook with the round-nosed pliers. If your pins are anything like mine, they will flake when you work them. Just sand them smooth again when you're done.

Step 3:
Draw a circle in the cardboard. Size doesn't really matter - mine has a diameter of about 4" (10 cm). Mark the center. Cut out the circle, then cut a notch in the cardboard.

Step 4:
Sand the coating off the pencil all the way around near the eraser end. Brush away any dust left on the pencil.

Step 5:
Poke a hole in the center of the cardboard circle and push the pencil through until the cardboard is over the part of the pencil with the exposed wood. Paint the area where the cardboard and wood meet with white glue on both sides. Let dry completely.

Step 6:
Use your spindle to spin yarn!

I only had a small bit of raw wool, but I love the way the handspun yarn turned out. If anyone reads this and they have sheep (or alpaca, or rabbits, or really anything with long fur other than boyfriends with back hair), please let me know... I keep staring at bags of cotton balls in the drug store... One of these days...